Are you looking to create your own sticker labels but don’t know where to start? Printing your own stickers can seem tricky, but it’s easier than you think.
Thank you for reading this post, don't forget to subscribe!Imagine having custom labels that perfectly match your style or brand—without paying extra for someone else to make them. In this guide, you’ll discover simple steps to print sticker labels right from your home or office. By the end, you’ll feel confident and ready to bring your ideas to life with stickers that stand out.
Keep reading to unlock the secrets of easy, professional-looking sticker printing!
Choosing Sticker Materials
Choosing the right materials is key for printing sticker labels. It affects the look, feel, and how long the stickers last. Picking the proper paper and adhesive makes your labels work better. Think about where and how you will use the stickers.
Types Of Sticker Paper
Sticker paper comes in many types. Matte paper has no shine and looks smooth. Glossy paper is shiny and bright. Clear sticker paper lets the surface show through. Vinyl paper is strong and water-resistant. Pick paper based on your design and use.
Selecting The Right Adhesive
Adhesive keeps your sticker in place. Permanent glue sticks firmly and lasts long. Removable glue lets you peel off stickers easily. Some adhesives work on rough or curved surfaces. Consider the surface before choosing the glue type.
Considerations For Durability
Durability matters for outdoor or heavy-use stickers. Waterproof paper stops water damage. UV-resistant paper prevents colors from fading. Thick paper holds up against tearing. Match durability with where the sticker will go.
Credit: www.avery.com
Designing Your Stickers
Designing your stickers is the first step to making them stand out. A good design grabs attention and shows your message clearly. It helps your stickers look professional and fit your needs. Focus on simple, clear designs. Use bright colors and readable fonts. Think about the sticker’s purpose and where it will be used. Planning your design well saves time and materials during printing.
Using Design Software
Design software helps create precise sticker layouts. Programs like Adobe Illustrator, Canva, or Inkscape work well. They offer tools for shapes, text, and colors. Use layers to separate elements for easy editing. Choose software you find easy to use. Many have templates made for sticker sizes. Save your work in a high-quality format like PNG or PDF.
Setting The Correct Dimensions
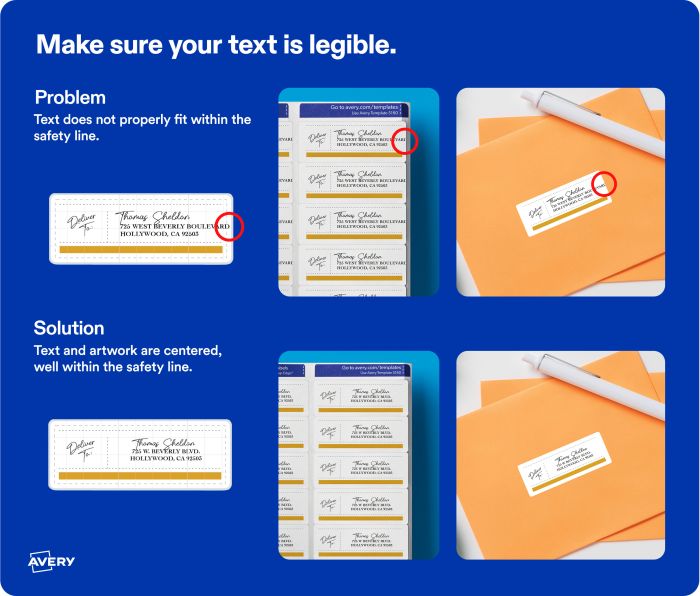
Measure the space where stickers will go before designing. Use exact width and height in your software. Common sticker sizes include 2×2 inches or 3×4 inches. Leave some space around the edges for cutting. This space is called a bleed area. It prevents white borders after cutting. Check printer guidelines for size limits and margins.
Incorporating Branding Elements
Branding makes your stickers recognizable and unique. Add your logo clearly and at the right size. Use your brand colors to keep consistency. Choose fonts that match your brand style. Include a website or contact info if space allows. Keep the design simple to avoid clutter. Your brand identity should be clear at a glance.
Printer Selection
Choosing the right printer is key to printing sticker labels well. The printer affects the quality, color, and durability of your stickers. Not all printers handle sticker paper the same way. Selecting a printer that matches your needs saves time and money.
Inkjet Vs. Laser Printers
Inkjet printers spray ink directly onto paper. They create bright and colorful stickers. Inkjet works well for small batches and detailed images. Laser printers use toner and heat to print. They produce sharp text and last longer on labels. Laser is best for large quantities and fast printing.
Printer Compatibility With Sticker Paper
Sticker paper types differ in thickness and finish. Glossy, matte, and clear sticker sheets require specific printers. Check if your printer supports thick paper. Some printers jam or smudge on sticker sheets. Use paper recommended by the printer manufacturer.
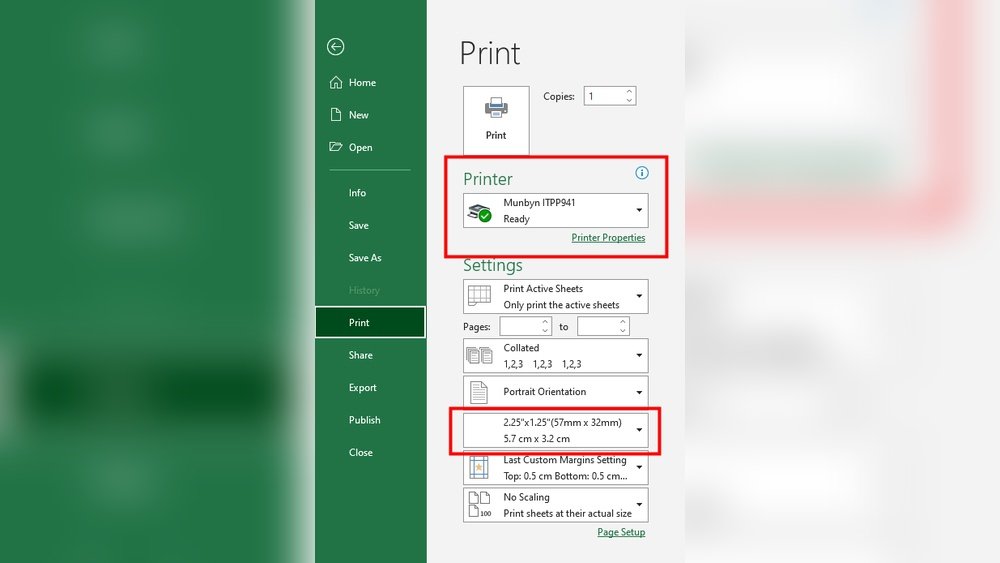
Setting Printer Preferences
Adjust printer settings before printing labels. Choose the right paper type in the printer menu. Set print quality to high for better colors. Select “photo” or “label” mode if available. Disable duplex printing to avoid paper jams. Test print on plain paper first.
Preparing The Print
Preparing the print is a key step to get perfect sticker labels. It helps avoid wasted sheets and poor quality prints. Following simple steps ensures your stickers come out sharp and clear. Focus on loading the sheets right, setting up the printer, and testing the print first.
Loading Sticker Sheets
Place the sticker sheets carefully in the printer tray. Check the sheet’s orientation to match your printer’s feed direction. Keep the sheets flat to prevent jams or misprints. Avoid overfilling the tray to maintain smooth feeding. Align edges for accurate printing on each sticker.
Adjusting Print Settings
Open your printer settings before printing. Choose the right paper type, like “label” or “photo paper.” Set the print quality to “high” for sharp images and text. Adjust color settings to match your design’s colors. Select the correct paper size to fit your sticker sheets.
Test Printing Techniques
Print a test page on plain paper first. Check alignment and colors carefully. Adjust settings if the print looks off-center or faded. Use a small section of the sticker sheet for a test print. Confirm the printer uses the right side of the sheet. Repeat tests until the print looks perfect.
Printing Process
Printing sticker labels requires careful steps to get clear and durable results. The printing process starts with setting up your design and printer correctly. Choosing the right paper and ink helps achieve the best outcome. Each stage in printing plays a key role in making your labels look professional and last long.
Monitoring Print Quality
Check the print regularly during the process. Look for sharp colors and clear text. Watch for any smudges or streaks on the labels. Adjust printer settings if the colors look faded or uneven. Keep an eye on alignment to avoid crooked prints. Early detection of problems saves time and materials.
Handling Common Issues
Paper jams and ink smears happen often. Stop printing immediately if a jam occurs. Remove the jammed paper gently to avoid damage. If ink smears appear, clean the printer heads carefully. Replace low or empty ink cartridges. Use the correct paper type to prevent feeding issues. Small fixes keep the printer running smoothly.
Allowing For Drying Time
Freshly printed labels need time to dry fully. Rushing this step can cause smudges or sticking. Place the labels on a flat surface. Avoid stacking or touching them until dry. Drying time depends on the ink and paper used. Waiting helps maintain the quality and durability of your stickers.
Credit: www.staples.com
Cutting And Finishing
Cutting and finishing are key steps in making sticker labels look professional. Clean cuts and a smooth finish give your stickers a polished look. These steps also help protect your stickers and make them last longer.
Using Cutting Tools
Choose the right cutting tool for your sticker size and shape. Scissors work well for simple shapes and small batches. A craft knife offers precision for detailed designs. For larger projects, a cutting machine saves time and ensures uniform edges. Always cut slowly and follow the sticker outline carefully. This prevents jagged edges and keeps the design intact.
Laminating Stickers
Laminating adds a protective layer to your stickers. It stops scratches, water damage, and fading. Use a clear laminate sheet or spray to cover the sticker surface. Press the laminate smoothly to avoid bubbles and wrinkles. Laminated stickers last longer and look shiny. This step is especially useful for outdoor or frequently used stickers.
Storage Tips For Stickers
Store stickers flat to avoid bending or curling. Keep them in a cool, dry place away from sunlight. Use plastic sleeves or folders to protect stickers from dust. Label storage containers for easy access. Proper storage keeps stickers fresh and ready for use anytime.

Credit: www.youtube.com
Frequently Asked Questions
How Do I Choose The Right Printer For Sticker Labels?
Choose a printer that supports sticker paper and offers high resolution. Inkjet printers work well for vibrant colors. Laser printers are best for durability and sharp text. Ensure the printer matches your label size and type for optimal results.
What Type Of Paper Is Best For Printing Stickers?
Use adhesive sticker paper designed for your printer type. Matte, glossy, and clear finishes are common options. Choose paper thickness based on your label’s purpose. Proper paper ensures good print quality and easy label peeling.
How Can I Design Sticker Labels Effectively?
Use design software like Adobe Illustrator or Canva for precise layouts. Maintain proper label dimensions and bleed areas. Include high-resolution images and readable fonts. Keep the design simple and visually appealing for the best results.
What Settings Optimize Print Quality For Labels?
Set your printer to the highest quality or photo mode. Select the correct paper type in printer settings. Use color calibration if available. Avoid draft mode to prevent blurry or faded labels. These steps ensure sharp and vibrant prints.
Conclusion
Printing sticker labels is simple with the right steps. Choose good paper and a clear design. Use a printer that works well with labels. Cut the stickers carefully for a neat look. Test your print on regular paper first. This saves time and avoids waste.
Keep your workspace clean and organized. Practice makes perfect. Start small and improve with each try. Enjoy creating your own custom stickers at home.