Are you ready to make your brand, gifts, or personal projects stand out? Printing custom sticker labels is a simple and powerful way to do just that.
Thank you for reading this post, don't forget to subscribe!Whether you want to add a personal touch or create professional-looking labels, this guide will walk you through every step. By the end, you’ll have everything you need to print stickers that look great and stick perfectly. Let’s get started and turn your ideas into eye-catching labels you’ll be proud to show off!
Choosing Sticker Materials
Choosing the right material for your custom sticker labels affects their look and how long they last. Different materials fit different needs and uses. Picking the best one helps your stickers stand out and stay strong.
Paper Vs. Vinyl Options
Paper stickers are affordable and easy to print. They work great for indoor use and short-term projects. Vinyl stickers cost more but last longer. They resist tearing and peeling better than paper. Vinyl is perfect for outdoor use or rough surfaces.
Matte And Glossy Finishes
Matte finishes give stickers a smooth, non-shiny look. They reduce glare and feel soft to touch. Glossy finishes are shiny and bright. They make colors pop and catch the eye. Choose matte for a subtle style. Pick glossy to highlight vibrant designs.
Waterproof And Durable Choices
Waterproof stickers survive rain, spills, and humidity. They keep labels clear and readable. Durable materials resist scratches and fading. Use these for products exposed to water or rough handling. This keeps your stickers looking fresh longer.
Credit: www.stickermountain.com
Designing Your Sticker Labels
Designing your sticker labels is the first step to make them stand out. Good design grabs attention and shows your message clearly. It helps your stickers look professional and fit your brand style. Keep your design simple but strong. Use colors and fonts that match your purpose. Planning your design well saves time and avoids mistakes when printing.
Focus on clear text and bright images. Think about where you want to place your stickers. Design with that space in mind. Choose software that fits your skills and needs. Check your design size and resolution carefully. These details matter for sharp and clean prints.
Selecting The Right Software
Choose software that is easy to use and suits your skill level. Programs like Canva, Adobe Illustrator, or even Microsoft Word work well. Canva is great for beginners with many templates. Adobe Illustrator offers advanced tools for detailed designs. Pick software that lets you save files in high quality formats like PDF or PNG.
Creating Eye-catching Designs
Use bold colors to catch the eye quickly. Simple shapes and clear fonts make your message easy to read. Avoid clutter and too many details. Add a small logo or icon to build brand identity. Make sure your text stands out from the background. Test your design by viewing it in different sizes.
Setting Correct Dimensions And Resolution
Measure the space where the sticker will go. Set your design size to match these dimensions exactly. Use at least 300 dots per inch (DPI) for sharp prints. Low resolution causes blurry or pixelated stickers. Check the printer’s recommended size and format before saving your design. Keep a small margin to avoid cutting important parts.
Preparing Your Printer
Preparing your printer is a key step before printing custom sticker labels. Proper setup ensures crisp, clear prints and prevents paper jams. It saves time and avoids wasted materials. Follow simple steps to get your printer ready for sticker printing.
Printer Types For Stickers
Inkjet and laser printers are common choices for sticker printing. Inkjet printers offer bright colors and smooth gradients. They work well with glossy and matte sticker sheets. Laser printers use toner and heat, producing sharp text and images. They suit matte and transparent stickers. Choose a printer that fits your sticker material and design needs.
Loading Sticker Sheets
Use the printer’s manual feed or rear tray for sticker sheets. This method reduces bending and feeding issues. Place the sheets with the printable side facing the correct direction. Check your printer’s guide for the best loading position. Avoid overloading the tray to prevent jams. Handle sheets gently to keep the surface clean and smooth.
Adjusting Printer Settings
Change your printer’s settings for optimal sticker printing. Select the correct paper type, such as photo paper or labels. Set the print quality to high for sharp details. Disable duplex printing to avoid smudging. Adjust color settings to match your design’s look. Preview the print to check alignment and color accuracy before printing on sheets.
Printing Process
The printing process is a key step in creating custom sticker labels. It shapes the final look and quality of your stickers. Knowing how to print correctly saves time and materials. It also ensures your labels look professional and vibrant.
This process involves setting up your printer, preparing the label sheets, and carefully printing each design. Small details matter, like choosing the right paper and adjusting printer settings. Following the right steps helps avoid common mistakes and wasted ink.
Test Printing Tips
Start with a test print on plain paper. Check colors, alignment, and size before using sticker sheets. This step saves money and prevents errors. Print a small section first. Look closely at details and text clarity. Adjust your design or printer settings if needed.
Color Management
Colors can look different on screen and paper. Use color profiles to match screen colors with print results. Calibrate your monitor to see true colors. Choose the right ink type for your printer. Bright, clear colors make stickers stand out and look good.
Handling Printing Errors
Errors like smudges or streaks can happen. Clean printer heads regularly to avoid poor print quality. Use fresh ink cartridges and good-quality sticker paper. If colors bleed, lower the printer speed or dry time. Fix alignment problems by recalibrating your printer before printing again.
Cutting And Finishing
Cutting and finishing are key steps in making custom sticker labels look great. This stage shapes your stickers and protects them for long use. Proper cutting ensures clean edges, while finishing adds a professional touch. You can choose from different cutting methods and coatings to suit your needs.
Manual Vs. Die-cut Methods
Manual cutting uses scissors or craft knives to trim stickers. It works well for small batches or simple shapes. This method is cheap but needs steady hands. Die-cutting uses metal templates to cut many stickers at once. It offers precise and consistent cuts for complex shapes. Die-cutting fits large orders and saves time.
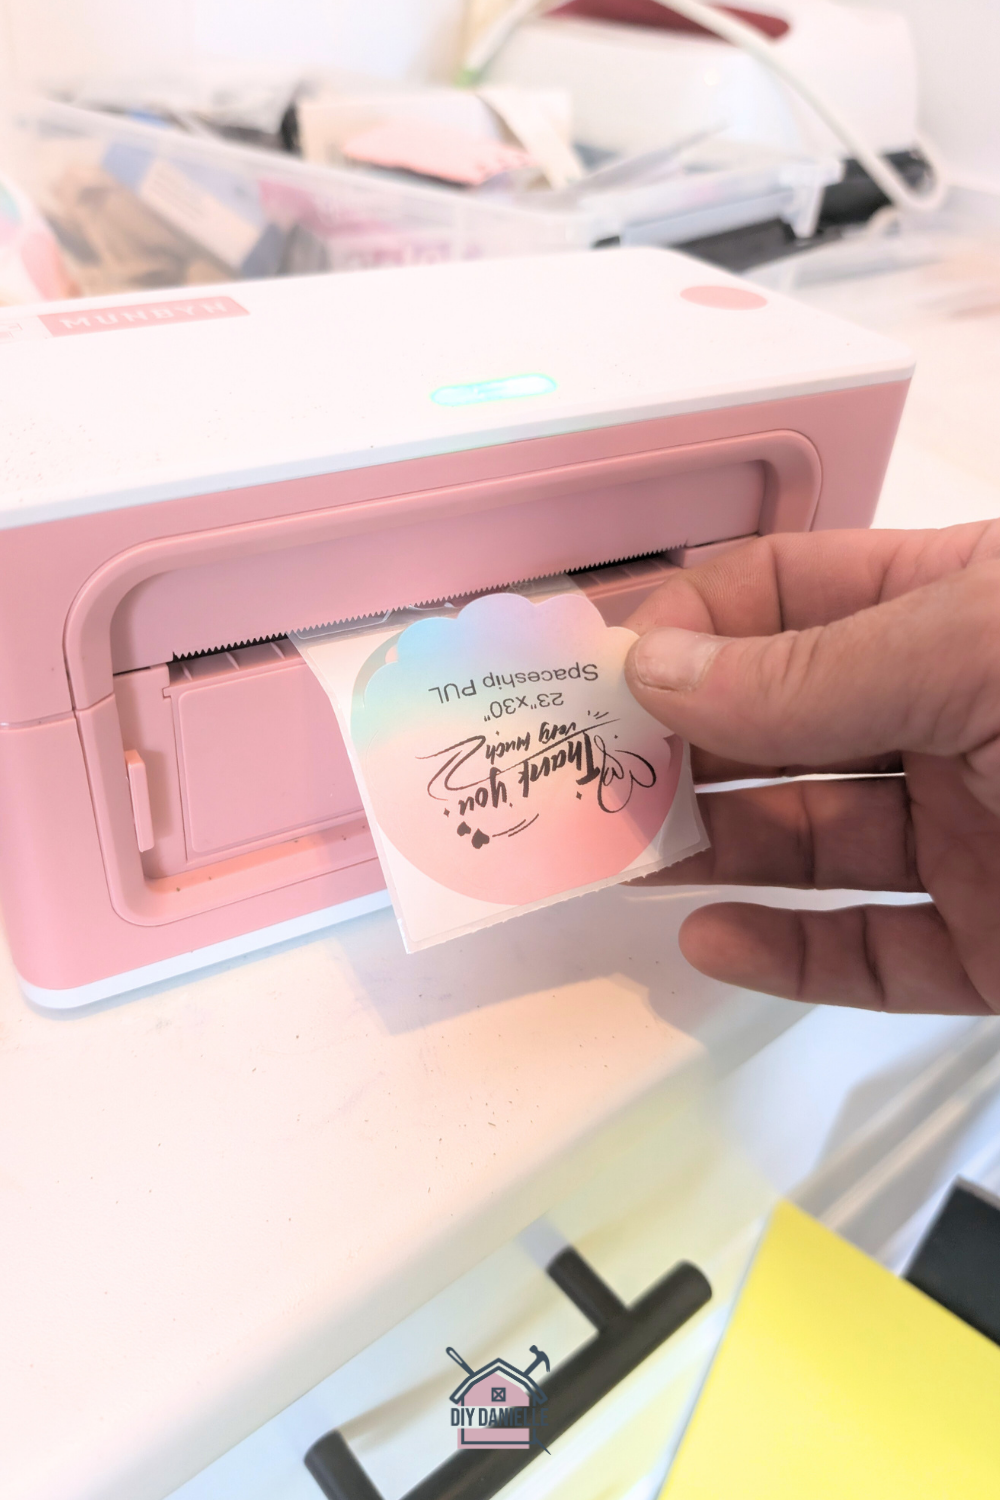
Using Cutting Machines
Cutting machines like Cricut and Silhouette automate the trimming process. They follow digital designs for exact cuts. These machines handle curves and details with ease. They suit small businesses and hobbyists. Using a cutting machine reduces errors and speeds up production.
Applying Protective Coatings
Protective coatings improve sticker durability and appearance. Options include laminate sheets, spray varnish, or UV coating. Coatings protect against water, scratches, and sunlight. Choose a matte or glossy finish to match your style. A good coating keeps stickers vibrant and long-lasting.
Credit: diydanielle.com
Troubleshooting Common Issues
Troubleshooting common issues can save time and reduce waste when printing custom sticker labels. Problems like smudges, paper jams, and color mismatches often happen. These problems disrupt the printing process and affect the final look of your stickers. Knowing how to fix them helps keep your projects on track.
Dealing With Ink Smudges
Ink smudges appear when ink does not dry fast enough. Avoid touching the printed side until it is dry. Use the right type of paper designed for your printer. Clean the print heads regularly to stop ink buildup. Adjust printer settings to lower ink saturation for faster drying.
Avoiding Paper Jams
Paper jams occur when the paper feeds incorrectly through the printer. Use smooth, clean sheets without folds or tears. Load the paper stack properly, aligning edges with guides. Remove any stuck paper gently to avoid damage. Check for debris inside the printer and clean it often.
Fixing Color Mismatches
Color mismatches happen when printed colors differ from the design. Calibrate your printer to improve color accuracy. Use high-quality ink cartridges and replace old ones. Adjust color settings in your printing software for better results. Print a test page before the final print to check colors.
Tips For Professional Results
Printing custom sticker labels can be fun and rewarding. Getting professional results requires some care and attention. Small steps make a big difference in print quality and durability. Follow these tips to get the best from your printer and materials.
Choosing High-quality Materials
Start with good sticker paper. High-quality paper holds ink better and lasts longer. Matte or glossy finishes can change the look. Pick the right type for your project. Use ink that matches your printer type. Avoid cheap materials that fade or peel quickly.
Maintaining Printer Health
Keep your printer clean for sharp prints. Dust and dried ink cause streaks and smudges. Run cleaning cycles regularly. Use the right printer settings for labels. Replace ink cartridges before they run out. Regular care prevents costly mistakes and wasted labels.
Optimizing Design For Print
Design with printing in mind. Use high-resolution images for clear details. Avoid tiny fonts that blur when printed. Leave enough margin space to avoid cutting off edges. Use colors that print well and match your vision. Check your design on screen and with test prints.

Credit: www.amazon.com
Frequently Asked Questions
What Materials Are Best For Custom Sticker Labels?
The best materials include vinyl, paper, and polyester. Vinyl is durable and waterproof. Paper is affordable for indoor use. Polyester offers high durability and resistance to chemicals and UV light. Choose based on your sticker’s purpose and environment.
How Do I Design Custom Sticker Labels Effectively?
Use clear, simple graphics and readable fonts. Maintain high resolution (300 DPI) for print quality. Consider your brand colors and message. Use design software like Adobe Illustrator or Canva. Always preview before printing to ensure accuracy.
What Printing Methods Work For Custom Sticker Labels?
Common methods include digital printing, screen printing, and thermal printing. Digital printing offers high detail and quick turnaround. Screen printing is cost-effective for large runs. Thermal printing suits barcode or label printing needs. Choose based on quantity and quality requirements.
Can I Print Custom Sticker Labels At Home?
Yes, you can print at home with an inkjet or laser printer. Use compatible sticker paper and set the printer to high-quality mode. Home printing is ideal for small batches and prototypes. For large orders, professional printing is better.
Conclusion
Printing custom sticker labels can be simple and fun. Choose the right materials and tools first. Design your labels clearly and keep them neat. Test print on plain paper before using sticker sheets. Cut your labels carefully to keep edges smooth.
Personalizing labels helps your items stand out. Practice a few times to get better results. Enjoy the process and create stickers you love. Start small and improve with each print. Your custom labels will add a special touch. Give it a try today!